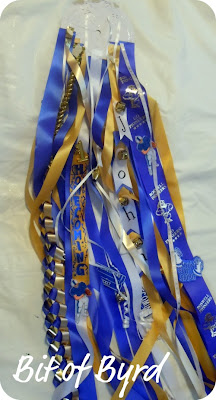
 This is what we are working towards today. It is a hot mess of color and craziness and fun! In the supplies I am sharing my preferences. What is great about this is you can be as creative as you like!
Supplies:
-Stapler, Staples
-Scissors
-Ribbon
-3 colors:: Large, Medium width in all
-Curling
-Specilty:: School name, Favorite Sport, "Homecoming", "Sophomore", "Senior" you get the idea
-Trinkets
-Bells
-Mini footballs
-Mini plastic homecoming tickets
-mini football players
-mini helmets
-A dated trinket they have several to choose from
-"Homecoming" Arch used on another step

Step 1:: Deciding on your length and cutting ribbon
The length of the ribbon your want will depend on the height of the person the mum is for and their personal preference. I never gave my sister preference and the mum was often to her feet.
A mum will usually be worn level with your chest so keep that in mind. I'm not tall and look at how long that mum was on me!
The most common mum I would make would range from 30-36 inches for ribbon length.
I would start by cutting 12 pieces of each ribbon type and color to the length I needed. tip:: look at how long your roll is and make the most of that roll
Step 2:: Make Fancy ribbons!

They sell these chains at the store... but why buy them when you can make them. That is the point in this project, right?
So I am not going to show you how... I am going to send you to where I learned how. The hardest part starting out was not knowing the "real" name of the ribbons.
The Artful Crafter
I only personally use the Military and Spirit. I couldn't get the diamond back to work out and the love chain uses too much ribbon in my opinion.
Step 3:: Staple your ribbon onto a backing
I started by stapling the wide pieces in the back. I layered the pieces coming forward.
We are building the mum the same way we will look at so make sure you have the pretty side of the ribbon facing out.
It doesn't matter how crazy this part looks because no one see it at the end!
Having the mum hang when you are putting the ribbons on helps some people. I prefer having it laying flat on a large table or on the floor.
Step 4:: Add Trinkets and a name!
A name you say?? Yes, traditionally the boy will wear the girl's name and vise versa. Not everything is traditional these days... so you would expect to find your date's name.
To add John's name I cut ribbon sections about 3 inches long. I cut a coordinating color about the same size for under it.
To make the cut out, put the two pieces together, gently fold the ribbons in the middle and cut.
That allows you to get a matching cut.
I stapled the ribbon pieces to an existing piece that was prominent in the front.I then covered top of the ribbon with a staple to give it a finished look.

[watch for follow up posts for name alternatives]
When adding specialty ribbon, sometimes it is easiest to add it to ribbons already on the mum. This gives you more control over where the word or phrase you want to be seen lands.
To add bells, I just tie them on, usually to the curling ribbon. But hot glue is a great friend for that too. I hot glue all my trinkets on. tip:: when gluing a bell be careful to not allow the ball in the bell to get in the glue. you will lose your sound.
IMPORTANT:: even though we are doing trinkets... resist the urge to put any on the flower right now!
That's all for today... so much freedom in making a mum. I encourage you to think outside the box when shopping for trinkets. Don't stay in the mum section. Look at toys and scrapbooking stickers. I will talk about that more in a follow up post.
Need to catch up? All the mum posts::
Homecoming Mums | Their History:: My version
Homecoming Mums | Ribbons and Trinkets
Homecoming Mums | Finishing the Mum
Homecoming Mums | Variations and Enhancements
Homecoming Mums | Garters:: Guys need bling too


Comments
Post a Comment