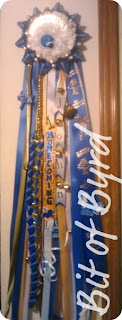
This is the finishing product we are working towards.
This is all about adding a hanger, and finishing the mum.
This part is easy and gives it the finished look that everyone wants
Supplies for this part:
Ribbon
Hot glue gun and glue LOTS OF IT
Staple gun and staples
This post is more glue intensive that staple intensive ::grin::
Step 1:: You cover this mess with hot glue and add your flower!
I know it doesn't look pretty... but no one sees this part! You can see I did this one in a half hazard chaotic mess. Should give you confidence that you too can make this mess becoming amazing!
Step 2:: Add a hanger and hot glue another layer backing
When you tun over the flower and ribbon backing it looks like this.
You can see all my crazy stapling here. To add the hanger I stapled it in many places to give it support.
That is a very fancy...expensive pipe cleaner. I twisted it over itself at the flat part to give it strength. I had brown, so I went with it. Use what you have before you buy stuff is my motto.
I used a large safety pin to attach it to the girls' shirt. [watch for a follow up post with alternatives]
Douse it with hot glue, press together your layers. Make sure your flower stem pokes through the hole.
Step 3:: More hot glue and the last layer
This is what finishes the mum. You are gluing on a staple free layer. You trim the stem and you hot glue the back green piece on. This sandwiches all the layers together.
This also protects all those staples so that they don't snag any clothes.

Step 4:: Add trinkets to the flower!
So why did we wait so long? If the trinkets are added any earlier they can fall off because of all the smashing of layers together and they often end up crooked.
Add the trinkets and look at your work!
Homecoming Mums | Their History:: My version
Homecoming Mums | Making the Backing
Homecoming Mums | Ribbons and Trinkets
Homecoming Mums | Finishing the Mum
Homecoming Mums | Variations and Enhancements
Homecoming Mums | Garters:: Guys need bling too
This is all about adding a hanger, and finishing the mum.
This part is easy and gives it the finished look that everyone wants
Supplies for this part:
Ribbon
Hot glue gun and glue LOTS OF IT
Staple gun and staples
This post is more glue intensive that staple intensive ::grin::
Step 1:: You cover this mess with hot glue and add your flower!
I know it doesn't look pretty... but no one sees this part! You can see I did this one in a half hazard chaotic mess. Should give you confidence that you too can make this mess becoming amazing!
BAM! Instant gratification
note:: do not add the trinkets to the mum yet!
Step 2:: Add a hanger and hot glue another layer backing
When you tun over the flower and ribbon backing it looks like this.
You can see all my crazy stapling here. To add the hanger I stapled it in many places to give it support.
That is a very fancy...expensive pipe cleaner. I twisted it over itself at the flat part to give it strength. I had brown, so I went with it. Use what you have before you buy stuff is my motto.
I used a large safety pin to attach it to the girls' shirt. [watch for a follow up post with alternatives]
Douse it with hot glue, press together your layers. Make sure your flower stem pokes through the hole.
Step 3:: More hot glue and the last layer
This is what finishes the mum. You are gluing on a staple free layer. You trim the stem and you hot glue the back green piece on. This sandwiches all the layers together.
This also protects all those staples so that they don't snag any clothes.

Step 4:: Add trinkets to the flower!
So why did we wait so long? If the trinkets are added any earlier they can fall off because of all the smashing of layers together and they often end up crooked.
Add the trinkets and look at your work!
Need to catch up? All the mum posts::
Homecoming Mums | Their History:: My version
Homecoming Mums | Ribbons and Trinkets
Homecoming Mums | Finishing the Mum
Homecoming Mums | Variations and Enhancements
Homecoming Mums | Garters:: Guys need bling too


Comments
Post a Comment